Life gets busy but it's time to get back in the kitchen... so let's start easy and with a family favorite
Baked Ziti
1 pound whole milk cottage cheese or 1 percent cottage cheese (see note)
2large eggs, lightly beaten
3ounces grated Parmesan cheese(about 1 ½ cups)
Table salt
1pound ziti or other short, tubular pasta
3 cups + Rao's Marinara Sauce
¾teaspoon cornstarch
1cup heavy cream (see note)
8ounces low-moisture whole-milk mozzarella cheese, cut into ¼-inch pieces (about 1 ½ cups) (see note)
INSTRUCTIONS
SERVES 8 TO 10
The test kitchen prefers baked ziti made with heavy cream, but whole milk can be substituted by increasing the amount of cornstarch to 2 teaspoons and increasing the cooking time in step 3 by 1 to 2 minutes. Our preferred brand of mozzarella is Dragone Whole Milk Mozzarella. Part-skim mozzarella can also be used, but avoid preshredded cheese, as it does not melt well.
Adjust oven rack to middle position and heat oven to 350 degrees. Whisk cottage cheese, eggs, and 1 cup Parmesan together in medium bowl; set aside. Bring 4 quarts of water to boil in large Dutch oven over high heat. Stir in 1 tablespoon salt and pasta; cook, stirring occasionally, until pasta begins to soften but is not yet cooked through, 5 to 7 minutes. Drain pasta and leave in colander (do not wash Dutch oven).
Stir cornstarch into heavy cream in small bowl; transfer mixture to now-empty Dutch oven set over medium heat. Bring to simmer and cook until thickened, 3 to 4 minutes. Remove pot from heat and add cottage cheese mixture, 1 cup tomato sauce, and ¾ cup mozzarella, then stir to combine. Add pasta and stir to coat thoroughly with sauce.
Transfer pasta mixture to 13- by 9-inch baking dish and spread remaining tomato sauce evenly over pasta. Sprinkle remaining ¾ cup mozzarella and remaining 1/2 cup Parmesan over top. Cover baking dish tightly with foil and bake for 30 minutes.
Remove foil and continue to cook until cheese is bubbling and beginning to brown, about 30 minutes longer. Cool for 20 minutes. Sprinkle with remaining 2 tablespoons basil and serve.
Monday, November 5, 2018
Tuesday, May 27, 2014
Super sweet potatoes!
I know it isn't your standard time of year for sweet potatoes but these are great warm or cold all year round! They are a distant cousin to what you think of traditional sweet potato dishes... it has a wonderful lemony tang and sweet cinnamon kick!
Ingredients
| 2 | lb. sweet potatoes (about 3 medium) | |
| 1 | Tbsp. unsalted butter | |
| 2 | Tbsp. dark brown sugar | |
| ½ | cup fresh lemon juice (from about 3 lemons) | |
| ⅛ | tsp. ground cinnamon | |
| ⅛ | tsp. kosher salt |
Steps
- Preheat the oven to 325 degrees.
- Peel the sweet potatoes and cut them into 1-inch-thick slices. Grease a 9-by-13-inch baking dish with the butter. Arrange the sweet-potato disks in a single layer in the pan.
- Mix the brown sugar, lemon juice, cinnamon, and salt in a small bowl, and pour the glaze evenly over the potatoes.
- Cover the baking dish with aluminum foil, and bake until the potatoes are fork-tender, about 45 minutes. Remove the foil and cook for about 5 more minutes, until the glaze has thickened and become syrupy. Serve immediately.
Monday, November 18, 2013
Amy's Butternut Squash, Gruyere, and Brown Butter Mac & Cheese
This trip to the beach Amy served some delicious Mac & Cheese that was delicious. For those of you interested here is her recipe:
Butternut squash, gruyere and brown butter mac & cheese serves 6
1 tbsp plus 1/2 tsp kosher salt
8 oz mini farfalle pasta (or use small elbow macaroni) (Amy used quinoa pasta)
5 tbsp salted butter
2 c. coarse, fresh bread crumbs (preferably homemade)
4 oz Pecorino Romano or Parmesan cheese, finely grated (about 2 cups)
1 tbsp finely chopped fresh sage leaves, plus 12 whole leaves
1 lb butternut squash, peeled, seeded and cut in 1/2" chunks
1-1/2 c. whole or reduced-fat milk
1-1/2 c. heavy cream
12 oz. Gruyere cheese, coarsely grated (about 4 c.)
1/4 tsp cayenne pepper
Preheat the oven to 375 degrees. Butter an 8" baking dish or pan. Set aside.
Fill a 4 - 5 qt. pot about the 3 quarters full with water and add 1 tbsp of the salt. Bring to a boil and add the pasta. Cook stirring once or twice, until tender but firm 4 to 6 min. and drain. Reserve the pot.
In medium skillet, melt 3 tbsp of the butter. Turn off the heat and add the bread crumbs and 1 c. of the pecorino. Stir to combine. Transfer to a small bowl and wipe out but do no wash the skillet.
Line a small plate with paper towels. Using the same skillet melt the remaining 2 tbsp butter over med. heat and cook just until its starting to brown. Add the whole sage leaves and cook until the leaves are crisp and just beginning to darken, about 45 sec. Remove the pan from the heat. Using tongs, transfer the leaves to the paper towel-lined plate and reserve both the leaves and the butter.
Using the same pot you used to cook the pasta, combine the squash, milk, cream, and the remaining 1/2 tsp salt and the reserved sage butter. Cover and cook over med-low heat, stirring occasionally and watching to make sure the cream mixture does not boil. Simmer squash until it is very soft 20 - 30 min. Cool slightly. Place about half of the mixture in a blender or food processor and puree. Put the puree back into the post and repeat with the remaining squash. Add the Gruyere, the remaining pecorino, the chopped sage, and the cayenne to the pureed squash mixture and stir until the cheese has melted (the heat of the squash mixture should melt it) Add the pasta and stir to combine.
Pour into the prepared baking dish, sprinkle with the bread crumb mixture and place the fried sage leaves in a decorative pattern on top. Place the dish on a rimmed baking sheet and bake for 30 minutes, or until the mixture is brown and bubbly. Let cool for 15 minutes before serving.
Add ins:
Pancetta: Cut a 4 oz piece of pancetta into a 1" long and 1/4 inch wide "sticks" or batons. Place in med. skillet over med-high heat, and cook until the edges are browned and the pancetta is crisp. Using a slotted spoon add to the cheese sauce along with the pasta.
Sunday, July 21, 2013
Best damn Blood Mary
We had some time to chill out and relax this Sunday so I tried my hand at the Best Damn Bloody Mary recipe from Paso Robles Steak House and the audience agrees with the recipe name!

Bloody Mary Base:
5 ounces Worchestershire sauce
1 ounce Zinfandel
3 ounces olive juice
1 lemon, juiced
1 lime, juiced
1 Tablespoon Cajun Spice (you get to make your own!)
1 Tablespoon horseradish
8 dashes Tobasco
1 Tablespoon fresh ground pepper
Cajun Spice:
2-1/2 Tablespoons paprika
2 Tablespoons garlic powder
2 Tablespoons kosher salt (I recommend 1/4 Tablespoon)
1 Tablespoon black pepper
1 Tablespoon onion powder
1 Tablespoon cayenne or chili powder
1 Tablespoon dried oregano
1 Tablespoon dried thyme
1 Tablespoon celery salt
1/2 Tablespoon smoked paprika (I didn't have any so used 1/4 Tbl chipotle chili powder)
Preparation:
Start with pint glass, salt rim, fill with ice
Pour 2 ounces Bloody Mary Base
Pour 2 ounces Absolut Peppar and 2 ounces Absolut Citron
Fill to top with tomato juice (approx 4 oz)
Garnish with vegetable skewer (olives, celery, cherry tomato, bell pepper) and celery stalk
Tuesday, June 18, 2013
TWD: Tomato Galette
We were leaving for Maui so I worked quickly to get this one on the books. Tomato Galatte. It takes so few ingredients and those that are needed are basic staples. It was perfect for a "not much left in the house" dinner. The dough is very simple for this recipe and can be made quickly then put in the frig to chill earlier in the day.


I only had whole wheat flour left in the house so the galatte has a beautiful toasted look. There is also cornmeal in the dough which adds a nice chew to the crust.

It made a lovely light dinner with a glass of wine. I will definitely come back to this recipe with all sorts of vegetables and then all of the different summer fruits. It would work well for an appetizer because it is good cool (no ours didn't get a chance to cool), dinner or as a dessert with the fruit. The possibilities are endless!
Wednesday, May 1, 2013
Marinated Olives
Photos to come cause I am making some again this weekend but thought I should share the recipe first...
Olive Marinade
1 (6-7 oz.) can black or green ripe pitted olives, drained
¼ C. Olive oil
2 Tbsp. Chopped fresh basil or oregano (I use basil)
2 Cloves garlic
1 Tbsp. Balsamic or white wine vinegar (I use Balsamic)
½ tsp. Hot red pepper flakes
¼ tsp. Salt
Combine all ingredients in a glad zipper storage bag, or in
a gladware container. Close, then
shake to coat.
Refrigerate at least 2 hours, or up to one month.
Serve at room temperature.
For best flavor, store leftover olives with brine.
***I like to mix the black and green olives together, so I
use a can of both and double up on the rest of the recipe.
Tuesday, April 30, 2013
TWD Rewind - Semolina Bread & Best Brownies Ever
It was a good time to do some baking and a great time to do some catching up with Dorie! I ventured in to two recipes. Semolina Bread was the first. I had bought the semolina flour when the recipe was first suggested. It has sat in the pantry causing pangs of guilt every time I saw it there. I made the recipe but failed to take pictures or write down my thoughts on it. The bread was delicious - a really hearty bread that was simple as far as my skills proved. Tom loved it and finished it off for me. You will just have to take my word for it.
The second recipe I got to was "The Best Brownies Ever". I have to say they were the best every brownies. Total chocolate fix. Chocolatey and gooey. So much so I had to get them out of the house pronto! I used a lot of bowls to make them but over all a simple recipe. I love doing recipes after everyone else because of all the tips and things to look for. There were so many good descriptions and thoughts in all of the different blogs that my brownies came out perfect. Thanks!!


The second recipe I got to was "The Best Brownies Ever". I have to say they were the best every brownies. Total chocolate fix. Chocolatey and gooey. So much so I had to get them out of the house pronto! I used a lot of bowls to make them but over all a simple recipe. I love doing recipes after everyone else because of all the tips and things to look for. There were so many good descriptions and thoughts in all of the different blogs that my brownies came out perfect. Thanks!!


Tuesday, April 2, 2013
TWD: Rustic Potato Loaves
I missed a whole month of baking but it was so worth it. I spent time with my daughter, her family and my new grandson Cody. He is so sweet. Isn't he delicious.

But back to baking. I love this bread, it is simple and made me feel so accomplished. I love that on the Tuesday with Dorie blog they do "things you need to know" questions and answers. I learn so much by checking it out before I attempt my own.

The trusty old kitchen aid was able to mash the potatoes and knead this dough to perfection. This bread also only needs two 20 - 30 minute rise times before it is popped in the oven. One of the other bakers talked about how it might be good with maybe onions or rosemary mixed in. Don't ask me twice on rosemary bread. The recipe makes two loaves so I was able to throw in some fresh rosemary into one.

I thought it was funny how my loaves look like they were made by two different people. I think the directions made more sense when I started to roll the second loaf.

The bread was so tender with a really nice crust. Another great tip was to steam the oven by throwing ice cubes into the oven. Delicious.

I thought butter was good on this bread but when my daughter, Jenn showed up with apricot jam and point reyes blue cheese - heaven! We almost finished the whole loaf!!
The recipe can be found in Baking with Julia or on the web site of our host this month Simply Sweet http://www.dawnssimplesweets.blogspot.com
Tuesday, February 19, 2013
TWD: Boga Negra
February is birthday month here. My birthday, Tom's birthday, Gramma Smith's birthday. What better way to celebrate then birthday dinner and a decadent chocolate cake!!
I gathered the supplies, lots of good chocolate. We went through the liquor cabinet for bourbon where we found lots of whiskey. We determined whiskey to be bourbon but named such as because of area or at least that is what we believe.
I have been watching The Chew and they had a great salmon dish on and I thought I would give that a try for dinner. Dessert was a no-brainer Boca Negra and it would keep me up to date with TWD.
This recipe is the chocolate addicts worst nightmare (or dream). Just the smell of the chocolate as you chop it up is enough to send you over the edge.
 The whole cake was made in the food processor. Incredibly easy. The batter is so creamy and divine. I guess that is what you get with that much chocolate, 5 eggs and 2 sticks of butter. I wanted to dance it went so well. I buttered my 9" cake pan poured the batter in and then read the recipe again. OM!!! I forgot parchment paper on the butter of the pan....... It was beautiful and I was sure it was going to be a disaster coming out.

 This is an incredible quick chocolate fix that you could make to impress dinner guests. For our birthday presents we got these great bracelets that track your movement & intake from Thomas, Molly, Jamie and Shawn. It is just what we need to know how hard we have to work to work this dessert off!
 By the way the salmon was delicious too! Long slow cooking topped with pesto and avocado salad makes for a light delicious treat.
 Thanks to Cathy of A Frederick Food Garden. You can find the recipe there if you do not have Baking with Julia.
The salmon recipe can be found at:
http://beta.abc.go.com/shows/the-chew/recipes/Slow-Roasted-Salmon-Michael-Symon
I gathered the supplies, lots of good chocolate. We went through the liquor cabinet for bourbon where we found lots of whiskey. We determined whiskey to be bourbon but named such as because of area or at least that is what we believe.
I have been watching The Chew and they had a great salmon dish on and I thought I would give that a try for dinner. Dessert was a no-brainer Boca Negra and it would keep me up to date with TWD.
This recipe is the chocolate addicts worst nightmare (or dream). Just the smell of the chocolate as you chop it up is enough to send you over the edge.


Needless to say it came out in one piece. It did take running a knife around the the edge and tapping but it came out!. In one piece! It looks like it would be dense but it is really creamy and loads of chocolate. The mouth feel is incredible. The topping is a white chocolate, cream with bourbon (or whiskey). It really set off the dark chocolate. The topping seemed more like stiff butter in its texture so I don't know if the consistency was right but the taste was really good. Since we have had almost springlike weather here my mint is sprouting and I thought it would be funny to imitate the picture from the book. I forgot to get the forks placed on the plate....close but not a good copy.


The salmon recipe can be found at:
http://beta.abc.go.com/shows/the-chew/recipes/Slow-Roasted-Salmon-Michael-Symon
Sunday, February 10, 2013
Cake Pops
This is for Kathy since we couldn't get together to make these. They are a little time consuming but when needed...weddings and fundraisers come in real handy when something special is needed.


 Once finally crumbled mix in 3/4's or more of the frosting. It takes a lot of mixing. You want it to stick together and hold its shape.


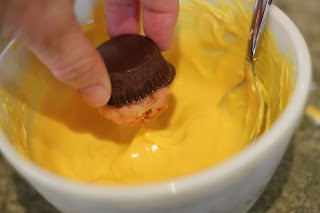 Now for the top of the cupcake. Here is the top going into the chocolate. Swirl it and let the excess chocolate drip off. Be sure to make sure the top and bottom (the ball) is completely covered. If it isn't the cake will ooze out of any gaps or cracks. Once it is dipped this is when you can use sprinkles and/or M & M's.

Looks simple enough.

All you need for the inside of the cake pops are basic cake mixes and a tub of cream cheese frosting. I like the cream cheese because it adds a good flavor.

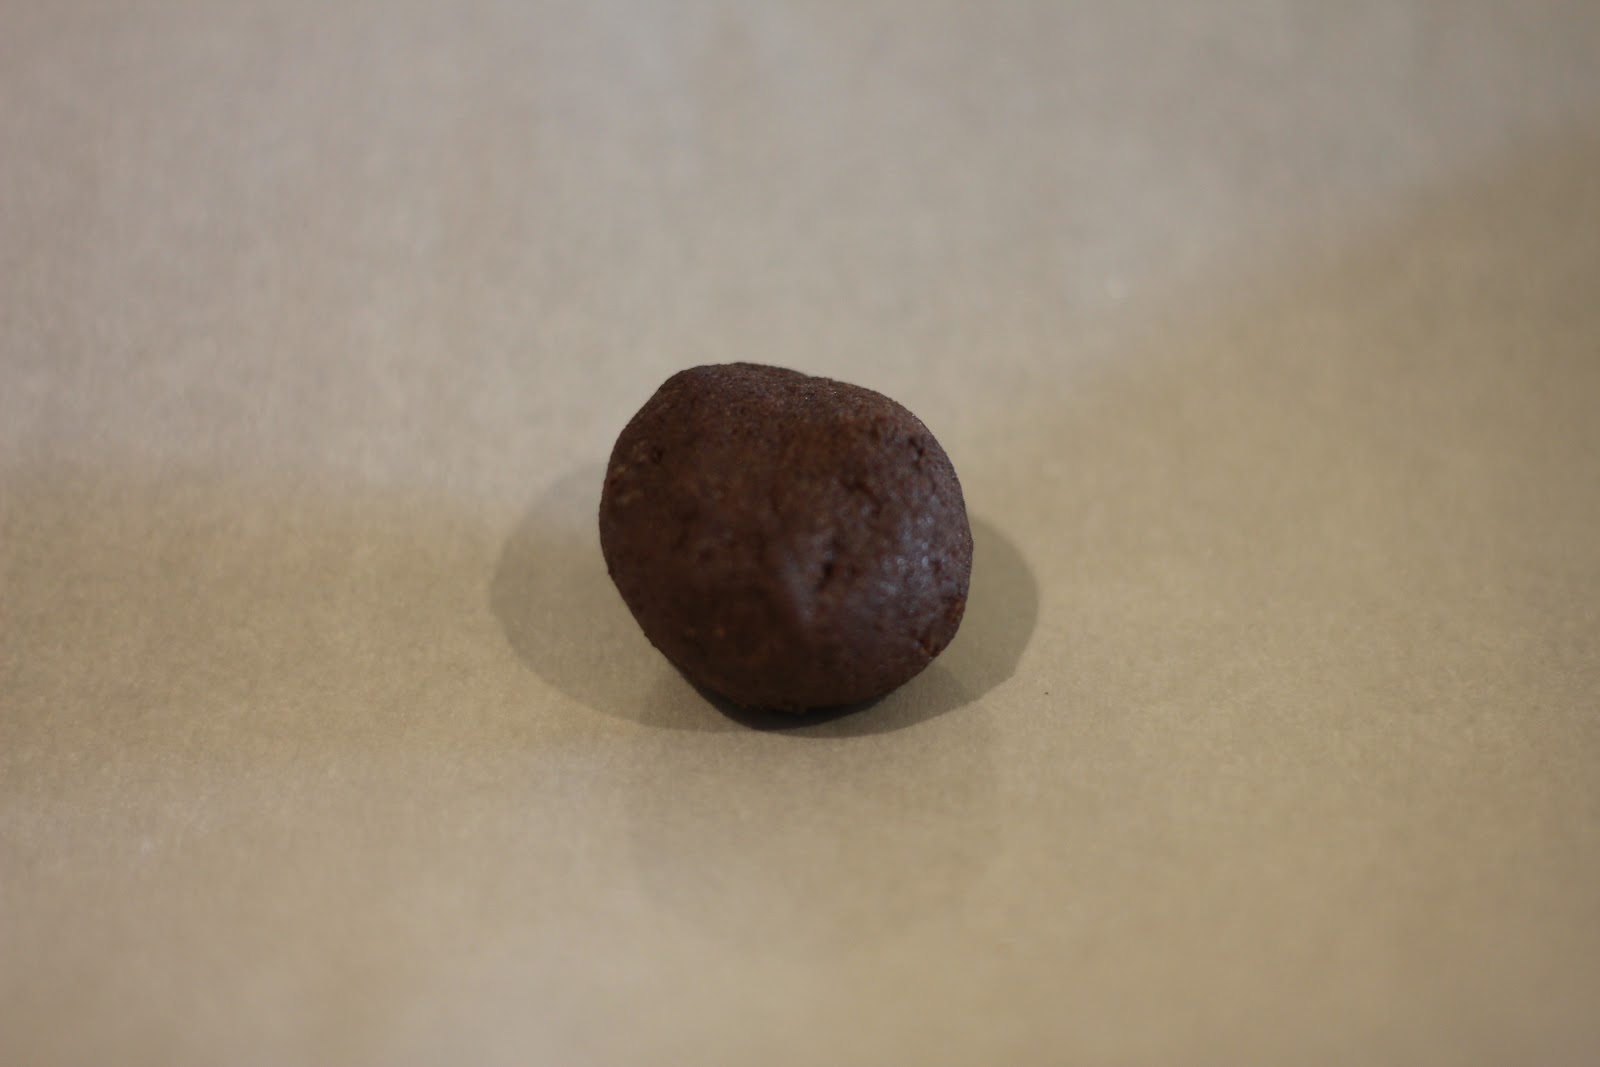
Bake the cake according to the directions. Let cool completely. I like to cut the cake into squares and crumble it by rubbing together. Its important to crumble without just mashing it together. Pull out any hard edges.


Once mixed wrap and chill.

This is what the funfetti cake mix looked like before headed for a chillin. I have been known to leave them in this state for a couple days. Just so I can have them ready for when I can devote time to the rest of the making.

After a good chilling start rolling little balls. I use an ice cream scoop so they are uniform.
When all the balls are rolled send for another chilling

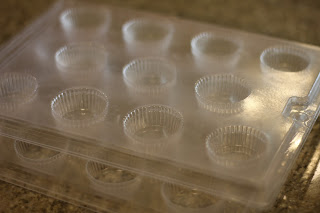
I use candy mold trays for the bottom of the cake pops. They look like the bottom of cupcakes.

Here is a tray full! One box usually gets me 40 balls.

Use the melting chocolates - I find them at JoAnns. Melt the chocolate according to the instructions on the package. Different colors seem to have different consistencies. Yellow is not fun to work with but white and chocolate I find the best. I fill the trays maybe to half full. You want the chocolate to come completely up the sides without spilling over the top when you put the ball into the chocolate. It is important on the sides because you will be holding on to that when dipping the top. Once in the trays you must chill it again. When the chocolate is solid it will let you pop it out of the trays pretty easily.


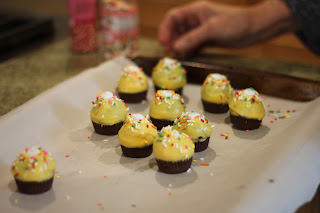
At this point you are done chilling. I then slip them in to candy bags and ribbon. This past weekend we sold them at the Sweet Heart Luncheon for Down Syndrome
The Queen of Cake Pops can be found on this blog Bakerella
this entry specifically http://www.bakerella.com/cupcake-bites-made-easy/
Tuesday, January 22, 2013
TWD: French Apple Tart
I had kind of made up my mind that I wasn't going to make this recipe for whatever reason. Then today I started reading the posts. I read on one how someone had found it really educational in that they tried several different techniques and it was very good. I then decided I should try it. I did not have a tart pan or apples so off to the store to make purchases before I could get started.
The nice thing about baking in a group is that if you wait till the last minute you can see how it went for everyone else. Like the crust doesn't look all the way cooked on the bottom on the first bake. Two (and I should of paid closer attention too) that it took a while from start to finish. But give it a go I did.
 Things I learned...I need more pie weights then I have. The crust shrinks and my tart pan was 10" which meant my crust didn't have much of an edge. The recipe for the crust is great - light and crisp.
 I also learned that I am not good at making apple rosettes but it still looked okay.

 Does it get any better then vanilla bean ice cream with hot apple tart. A celebration of a good day at work and this made it feel like a party.
 This is just a picture of how good this crust recipe is. I feel much more capable of making a crust with this recipe. The recipe can be found at our hosts website if you don't have the book. Thanks for hosting Laws of the Kitchen.
The nice thing about baking in a group is that if you wait till the last minute you can see how it went for everyone else. Like the crust doesn't look all the way cooked on the bottom on the first bake. Two (and I should of paid closer attention too) that it took a while from start to finish. But give it a go I did.


Tuesday, January 8, 2013
TWD: Pizza With Onion Confit
Today I decided to actually bake on Tuesday. We are making pizza. I have never actually made pizza dough and this recipe makes it very simple. The dough recipe is from Steve Sullivan of Acme Bread company so it had to be good.
This is the sponge. That was new to me. It gets the dough started. I found out that my oven has a proof setting so even though it was very cold I could pop it in the oven for the first rise at a steady 85 degrees.
 While the dough was rising I got to work on the onion confit. Real simple slice 2-1/2 pounds of onion and have a good cry. Then let it cook down on the stove for 1-1/2 hours. While this was cooking I also used up 2 lbs of broccoli making a broccoli soup to go with the pizza.

Everything was mixed and I had done the second rise. I wasn't going to bake the pizza till dinner so I wrapped the dough in saran wrap and popped it in the frig. When Tom got home and was looking for something to eat he yelled that my dough was leaking. I thought the dough had risen completely but in the frig it had grown more. The dough balls looked like sausages. This dough feels wonderful too.
 I took a tip from another TWD baker and put the pizza rounds on parchment paper. I had a pizza stone but after the kitchen remodel it cannot be found. I may have overloaded on the confit but it was very good. I would use the sweet onions next time.
 I get a box of produce delivered weekly and weekly it is my goal to eat all the vegetables. This pizza was the perfect showcase for the last butternut squash. The goat cheese, butternut squash and the onion confit were delicious.
 I started with a sponge and ended with a glass of wine. Except for the mountain of dishes it was a successful bake. I will use this pizza recipe again.
 If you are interested in the recipe you can find it in "Baking with Julia" or on our host's blog The Boy Can Bake.
This is the sponge. That was new to me. It gets the dough started. I found out that my oven has a proof setting so even though it was very cold I could pop it in the oven for the first rise at a steady 85 degrees.


Everything was mixed and I had done the second rise. I wasn't going to bake the pizza till dinner so I wrapped the dough in saran wrap and popped it in the frig. When Tom got home and was looking for something to eat he yelled that my dough was leaking. I thought the dough had risen completely but in the frig it had grown more. The dough balls looked like sausages. This dough feels wonderful too.


Subscribe to:
Posts (Atom)